HTTP Handlers And Modules
Really, I always like to work and read about ASP.Net request handling mechanisms. From the outside, it's just request & response tricks. But, if you go in-depth, then you will understand some interesting internal things.
Most developers have experienced questions on ASP.Net page life cycle in interviews.
I had that experience when I started my carrier. In this article, I am going to explain about the core part of the ASP.Net request processing. i.e HTTP Handler and HTTP Module.
What are HTTP handlers?
The ASP.Net life cycle starts with a request sent by a browser to the web server. When the web server receives the request, it will pass the request to an instance of the HTTP Runtime class. The HTTP Runtime object observes and figures out from which application it has been sent (virtual directory). Then it uses the HTTP Application factory to create a HTTP Application Object to process the request. The HTTP Application objects holds the collection of HTTP Module objects. HTTP Modules are filters that can modify the content of the HTTP request and response messages.
The next process is done by the HTTP Handler object. When a request passes through the pipeline, it looks at the file name extension. Depending upon the extension, the corresponding ISAPI extension (ISAPI extensions are implemented by using Win32 DLLs. These are typically developed using C/C++). If it is related to an ASP.Net extension such as aspx, then this will be handled by the HTTP handler which is the .Net equivalent of ISAPI extensions.
So, the HTTP handler is a program to handle a particular page type.
HTTP Module is another component; it also participates in the ASP.Net request process. But they work before and after the HTTP Handler does its work.
The HTTP Module is responsible for hooking events like:
BeginRequest : Before request processing starts
AuthenticateRequest : To authenticate client
AuthorizeRequest : To perform access check
ResolveRequestCache : To get response from cache
AcquireRequestState : To load session state
PreRequestHandlerExecute : Before request sent to handler
PostRequestHandlerExecute : After request sent to handler
ReleaseRequestState : To store session state
UpdateRequestCache : To update response cache
EndRequest : After processing ends
PreSendRequestHeaders : Before buffered response headers sent
PreSendRequestContent : Before buffered response body sent
In this way, HttpModule and Httphandler takes a important role while processing request.
So, that explains the purpose of a HTTP Handler.
Now I want to create one extension file like .arv and want to use it in my application.
Step 1:
First, we need to create a handler, so create a class library using Visual Studio and name it MyHandler.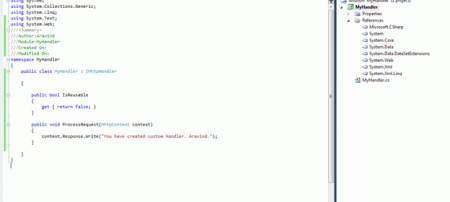
It contains one property and one function.
The IsReusable property specifies whether the same instance of HTTP Handler can be used to fulfill another request of the same type.
Process Request: This method is called when processing ASP.Net requests. Here you can perform all the things related to processing the request.
Here I have written a message to return.
Step 2:
Build the application and you will get MyHandler dll. 
Step 3:
Create one Visual Studio 2010 web application. Add a reference to the MyHandler class library. You can add assembly (dll) instead of class library.
I am adding a dll/class library to the web application because, I want to use this handler within this application only.
If you want to use it with all ASP.Net applications, then you have to add this assembly into IIS (Handler Mapping).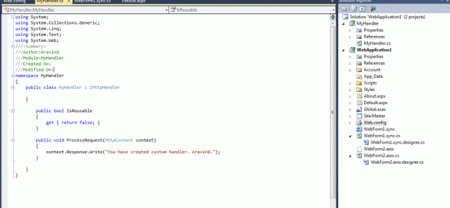
Step 4:
Add one web form to the web application and rename its extension aspx to arv as shown bellow.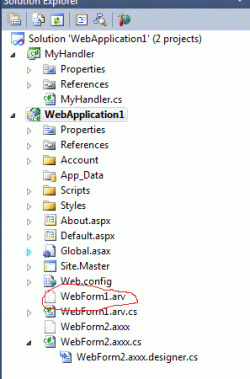
Step 5:
Register handler in web config.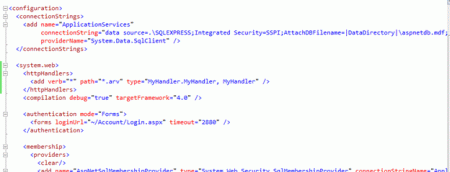
Under section System.web, I have inserted one more section called httphandlers.
Inside httphandlers, I have added one more tag
<add verb="*" path="*.arv" type="MyHandler.MyHandler, MyHandler" />
VERB: Verb attribute specifies the HTTP verbs supported by a handler. If the handler supports all of the HTTP verbs, simply use "*" , otherwise you can specify particular ones like "GET,POST".
PATH: Path is nothing but, just tell the handler to which type of file should be handled.
TYPE: Information about handled by whom. Here, MyHandler.MyHandler is namespace.class name. and MyHandler is the handler name.
Step 6:
Add the reference of the MyHandler class library to web application. Run the application.
Browse the newly added web form (new extension).
Thanks
Enjoy the coding!
Comments
Post a Comment